
Mouse Anti-E. coli IgG3 Antibody Assay Kit

- SKU:
- 445-6212
- Size:
- 1 kit
- Shipping:
- Gel Packs
- Storage:
- -20 C

Description
Mouse Anti-E. coli IgG3 Antibody Assay Kit - Cat Number: 6212 From Chondrex.
Research Field: Bacterial Research, Immunology
Clonality: N/A
Cross-Reactivity:
Host Origin: N/A
Applications: N/A
Isotype: N/A
Detection Range: 300 ng/ml-4.68 ng/ml
Sample Type: Serum, Plasma
Concentration: N/A
Immunogen:
DESCRIPTION: ELISA kits to quantify mouse anti-E. coli IgM and IgG3 antibodies
6209: Mouse Anti-E. coli IgM Antibody ELISA Kit
6212: Mouse Anti-E. coli IgG3 Antibody ELISA Kit
FORMAT: Pre-coated 96-well ELISA Plate with removeable strips
ASSAY TYPE: Indirect ELISA
ASSAY TIME: 4.5 hours
STANDARD RANGE: 500 ng/ml to 8 ng/ml
NUMBER OF SAMPLES: Up to 40 (duplicate) diluted samples/plate and up to 20 (duplicate) low dilution samples/plate
SAMPLE TYPES: Serum and Plasma
RECOMMENDED SAMPLE DILUTIONS: 1:200 (at least)
CHROMOGEN: TMB (read at 450 nm)
STORAGE: -20°C
VALIDATION DATA: 6209: Intra-Assay (6-7.6%)/Inter-assay (3.9-10%)/Spiking Test (104-108%)
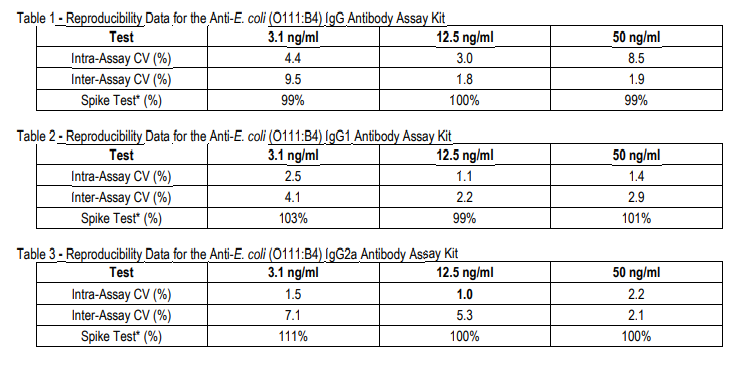
6212: Intra-Assay (2.8-4.9%)/Inter-assay (5.7-9.7%)/Spiking Test (94-108%)
INTRODUCTION
Recent studies indicate environmental factors, especially intestinal microbiota and their toxins, may play pathogenic roles in autoimmune diseases such as rheumatoid arthritis (RA) (1-7), inflammatory bowel diseases (IBDs) (8, 9), systemic lupus erythematosus (SLE) (10), and other chronic disorders (11-13). Increased translocation of bacteria and bacterial toxins associated with high mucosal permeability and low immune function may play roles in the primary and common pathogenesis of these autoimmune disorders (14).
Mice are ideal experimental animals to study this hypothesis due to the variety in genetic backgrounds, strains, and housing conditions (germ free, gnotobiotic, specific pathogen free, or conventional), which can affect susceptibility to potential pathogens. The variability of susceptibility to pathogens may contribute to the maturity of the immune system, depending on the environment. To facilitate and promote studies that determine immune responses to environmental agents, Chondrex.
Inc. provides mouse antibody ELISA kits against Escherichia coli O111:B4 (E. coli).In addition, Chondrex, Inc. also provides mouse antibody ELISA kits against lipopolysaccharide from E. coli O111:B4, Staphylococcus aureus, and Staphylococcal enterotoxins A & B. For further requests orconsultation, please contact support@chondrex.com or visit www.chondrex.com.
Mouse anti-E. coli IgG Antibody ELISA Kit (Cat # 6206)
Mouse anti-E. coli IgG1 Antibody ELISA Kit (Cat # 6207)
Mouse anti-E. coli IgG2a Antibody ELISA Kit (Cat # 6210)
Mouse anti-E. coli IgG2b Antibody ELISA Kit (Cat # 6211)
KIT COMPONENTS

ASSAY OUTLINE
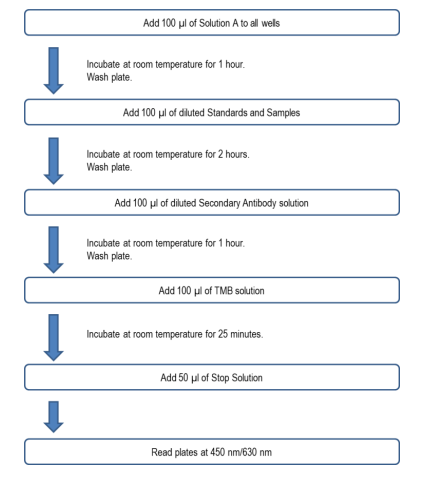
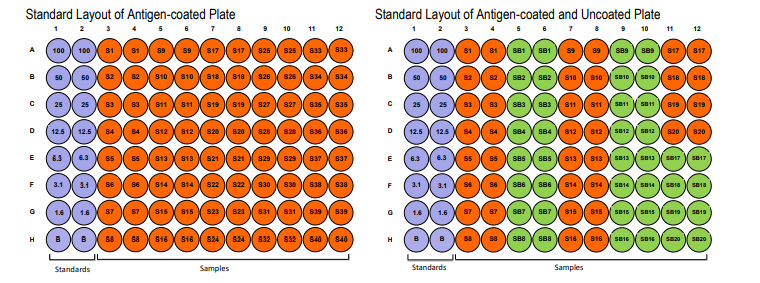
PLATE MAPPING
Map the plate based on the number of samples and sample dilution. For example, if sample dilution is more than 1:200, it is not necessary to run antigen uncoated wells, but if sample dilution is less than 1:200, it is necessary to run antigen uncoated wells to determine the background noise (BG) reaction OD values of individual samples
NOTES BEFORE USING ASSAY
NOTE 1: It is recommended that the standard and samples be run in duplicate.
NOTE 2: Warm up all buffers to room temperature before use.
NOTE 3: Crystals may form in Wash Buffer, 20X when stored at cold temperatures. If crystals have formed, warm the wash buffer by placing the bottle in warm water until crystals are completely dissolved.
NOTE 4: Measure exact volume of buffers using a serological pipet, as extra buffer is provided.
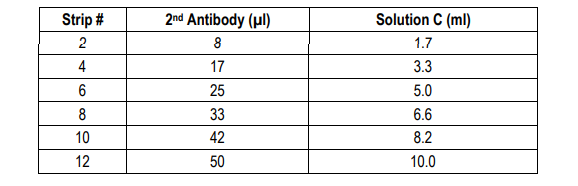
NOTE 5: Cover the plate with plastic wrap or a plate sealer after each step to prevent evaporation from the outside wells of the plate. NOTE 6: For partial reagent use, please see the assay protocol’s corresponding step for the appropriate dilution ratio. For example, if the protocol dilutes 50 µl of a stock solution in 10 ml of buffer for 12 strips, then for 6 strips, dilute 25 µl of the stock solution in 5 ml of buffer. Partially used stock reagents may be kept in their original vials and stored at -20⁰C for use in a future assay.
NOTE 7: This kit contains animal components from non-infectious animals and should be treated as potential biohazards in use and for disposal.
ASSAY PROCEDURE
Add Blocking Buffer: Add 100 µl of the Blocking Buffer (Solution A) to each well and incubate for 1 hour at room temperature.
NOTE: If a sample with a dilution of 1:200 or less is assayed, antigen non-coated strips should be used. Solution A must be added to the non-coated wells without prior washing because any contaminants in the vessel containing the washing buffer will bind to the strips. For example, add 100 µl of Solution A to the antigen-coated strips (S1) and the corresponding uncoated strips (SB1). Incubate for 1 hour at room temperature.
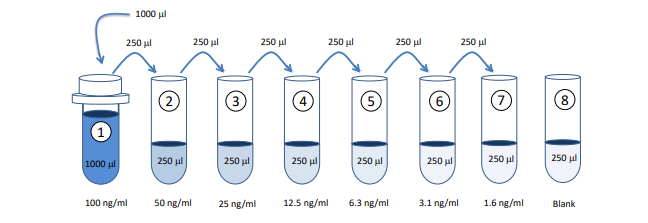
2. Prepare Standard Dilutions: Dissolve one vial of standard (100 ng/vial) with 1 ml Standard/Sample dilution buffer (Solution B) to maken a 100 ng/ml stock standard solution. Prepare standard serial dilutions by mixing 250 µl of the stock standard solution with 250 µl of Solution B (50 ng/ml). Repeat this procedure to make 25, 12.5, 6.3, 3.1, and 1.6 ng/ml standard solutions for a total of 7 serial standard dilutions. Keep the remaining 100 ng/ml stock standard solution at -20°C for future assays.
Prepare Sample Dilutions: Add 10 µl of serum sample to 990 µl of Solution B (1:100) and keep it as a stock solution for future assays. Then, further dilute the sample with Solution B depending on the antibody levels. For example, take 200 µl of the sample stock solution and mix with 200 µl of solution B to make a 1:200 dilution. If it is necessary to assay antibodies at a low dilution (less than 1:200) due to low antibody levels, antigen uncoated control strips will be necessary. Please contact support@chondrex.com for more information.
NOTE: Chondrex, Inc. recommends running a preliminary assay using various dilutions of sera (1:200, 1:1,000, 1:5,000) in order to determine the optimal dilution of your samples, especially before assaying a large number of samples.
4. Dilute Wash Buffer: Dilute 50 ml of 20X wash buffer in 950 ml of distilled water (1X wash buffer). Wash the plate with 1X wash buffer at least 3 times using a wash bottle with manifold or an automated plate washer. Empty the plate by inverting it and blot on a paper towel to remove excess liquid. Do not allow the plate to dry out.
5. Add Standards and Samples: Add 100 µl of standards, Solution B (blank), and samples to wells in duplicate according to the desired layout. Incubate at room temperature for 2 hours.
NOTE: If a sample with a dilution of 1:200 or less is assayed, add 100 µl of the diluted samples to the antigen-coated strips (S1) and the corresponding uncoated strips (SB1).
6. Wash: Wash the plate with 1X wash buffer at least 3 times using a wash bottle with manifold or an automated plate washer. Empty the plate by inverting it and blot on a paper towel to remove excess liquid. Do not allow the plate to dry out.
7. Add Secondary Antibody: Dilute one vial of Secondary Antibody with 10 ml of Secondary Antibody Dilution Buffer (Solution C). Add 100 µl of secondary antibody solution to each well and incubate at room temperature for 1 hour.
Wash: Wash the plate with 1X wash buffer at least 3 times using a wash bottle with manifold or an automated plate washer. Empty the plate by inverting it and blot on a paper towel to remove excess liquid. Do not allow the plate to dry out.
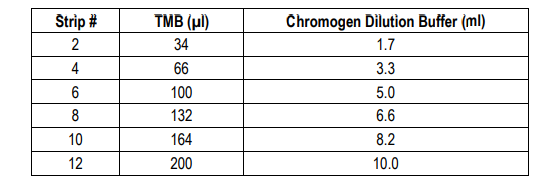
9. Add TMB: Use new tubes when preparing TMB. Dilute one vial of TMB with 10 ml of Chromogen Dilution Buffer just prior to use. Add 100 µl of the TMB solution to all wells immediately after washing the plate and incubate at room temperature for 25 minutes.
10. Stop: Add 50 µl of 2N sulfuric acid (Stop Solution) to each well.
11. Read Plate: Read the OD values at 450 nm (a 630 nm filter can be used as a reference) within 5 minutes after added Stop Solution. If the OD values of the samples are greater than the OD values of the highest standard, re-assay the samples at a higher dilution.
CALCULATING RESULTS
1. Average the duplicate OD values for the standards, blanks (B) and test samples in uncoated wells and coated wells.
2. Subtract the blank (B) values from the averaged OD values of the standards and test samples in uncoated wells and coated wells.
3. Subtract the OD values of samples tested in uncoated wells (background values) from their counterpart OD values in coated wells from
Step 2 to eliminate values associated with non-specific reactions.
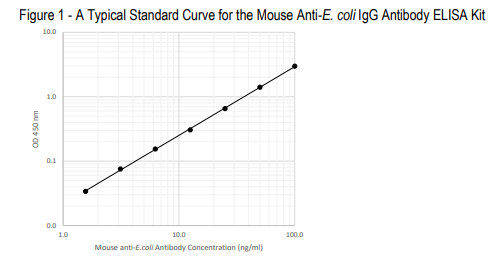
4. Plot the OD values of standards against the ng/ml of antibody standard. Using a log/log plot will linearize the data. Figure 1 shows a representative experiment where the standard range is from 1.6 to 100 ng/ml. The ng/ml of antibody in test samples can be calculated using regression analysis.
VALIDATION DATA
NOTES: N/A
Related Products
Related Products

Mouse Anti-E. coli IgG2b Antibody Assay Kit

Mouse Anti-E. coli IgG Antibody Assay Kit

Mouse Anti-E. coli IgM Antibody Assay Kit

Mouse Anti-E. coli IgG1 Antibody Assay Kit
